
Hi! I’m Mykhailo Khomenko, a DevOps Engineer at P2H. In this article, I’ll give an introduction to DevOps and show you how to get started with DevOps practices using containers and Docker.
Companies are constantly seeking ways to work more efficiently and reduce costs. This is where DevOps comes into play as a methodology that increases the speed and quality of software development.
If you’re new to DevOps, you probably have plenty of questions. And since DevOps is such a huge topic, it would be impossible for one article to answer them all. In this post, I’d like to give you a general understanding of the what, why, and how of DevOps from a technical perspective, and perhaps help you see where you need to go next to get from DevOps theory to practice.
Another goal is to draw the attention of developers, QA, and other IT professionals to Docker and its potential applications.
Let’s start with the basics.
What Is DevOps?
DevOps is a method of developing and deploying software that bridges the gap between software development and operational processes (hence the name). DevOps practices encompass software development, testing, deployment, monitoring, and support.
As a methodology, DevOps implies a shift in the approach to development, not just in terms of tools but also in the people’s minds: managers, analysts, developers, QA, infrastructure teams, and clients. This is why it can be said that DevOps is not just a set of practices but a specific culture.
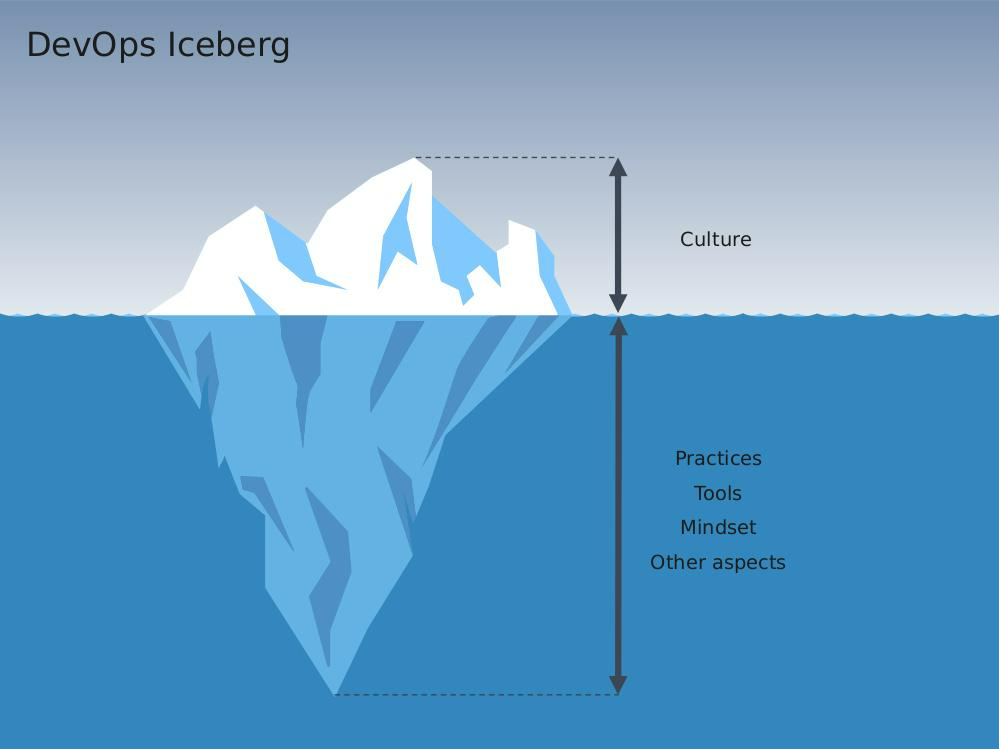
While a culture shift is imperative if you want to succeed with DevOps, in the rest of this article, I’ll focus on what goes on under the waterline: how DevOps fits into your development process and the technical knowledge you need to get started.
Why Do You Need DevOps?
The main goal of DevOps is to combine software development with efficient and reliable software delivery. More practically, it aims to optimize the following tasks:
Process automation: DevOps aims to automate as many processes as possible in the overall software development process to reduce time spent on routine tasks and minimize human error.
- Configuration management: DevOps uses version control systems, making it possible to track changes and restore previous code versions when needed.
- Testing: DevOps ensures regular software testing at different stages of development. This makes it easier to detect and rectify errors early on and ensure high product quality.
- Monitoring: DevOps enables software monitoring both during development and after release to pinpoint and address availability, performance, and security issues.
- Team collaboration: Overall, DevOps strives to build a culture of cooperation between developers, testers, and system administrators. This helps reduce error resolution time, improve communication, and ensure more efficient teamwork.
Where to Start: Using Containers
Let’s start our journey into DevOps implementation with a look at containers.
Containers are useful for deploying and running software on any device or environment. They isolate applications from the operating system and dependencies, which allows for more efficient application management, reduced deployment time, and independence from an operating environment. All these things help teams to align their work using unified (standard) tools and approaches.
Containers vs Virtual Machines
Containers and virtual machines (VMs) are both technologies that let you run applications isolated from other applications and the host operating system. However, some differences make containers more practical than virtual machines in many situations.
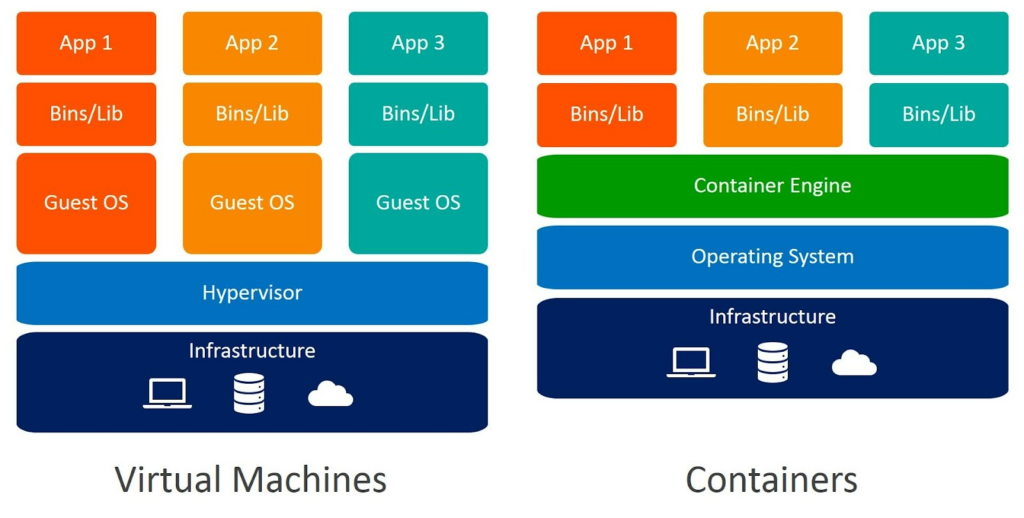
- Containers use less resource and system overhead, as each VM has its own copy of the operating system, while containers share the operating system with the host system. This means that containers speed up application development, testing, and deployment.
- Containers are easier and faster to create and deploy since they only contain the application and its dependencies, while a virtual machine needs to include a complete operating system.
- Containers are usually smaller and take up less disk space than virtual machines.
Naturally, these advantages don’t come free: there’s a security payoff. Containers are less isolated than virtual machines, so they can be less secure if there are security issues with the host system. In other words, if the host system is compromised, the containers may also be compromised. Nevertheless, there are workarounds for this issue.
The practice of using containers is nothing new. If you start Googling it, you’ll soon run into Docker as the most popular container implementation. So the next step is to understand what Docker is and how to use it.
Why Docker?
Running a simple search about Docker brings up a whole new set of concepts you may or may not be familiar with.
In fact, this is where many people decide they don’t need Docker and return to their good old local web server. But in the longer term, this actually creates more problems than it solves:
- Execution inconsistencies: Without a unified system where everyone uses the same tools, code is unlikely to work the same between teams, leading to “It works on my machine, figure it out yourselves.”
- Version management headaches: Suppose you need to run multiple websites locally with different PHP and MySQL versions. In that case, you have to change the versions for all of them, and it becomes impossible to run these sites separately with different configurations.
- Code transfer difficulties: How do you run your application on another machine or server? Or with another developer, you want to share it with? Both situations are challenging without a standard, shared environment.
The good news is that you don’t need to know all the intricacies of Docker to start using it to get more collaborative processes up and running. It’s enough to learn the basic operations, and if you want, you can delve deeper later.
Setting Up Containers in Docker: A Hands-on Example
The second piece of good news is that running Docker on Windows doesn’t take much effort. All you need to do is download Docker Desktop and choose to use WSL2 during installation, which allows running native Linux applications on Windows.
Setting Up Containers in Docker: A Hands-on Example
As an example, let’s run a local web server with NGINX. For this, we need to describe to Docker Desktop what exactly we want to run. We’ll create a folder called nginx, and within it, a file named compose-dev.yaml with the following content:
version: ‘3’
services:
nginx:
image: nginx
ports:
– 8080:80
Under the services directive, we list the containers we want to run. The container names can be anything, but it makes sense to name them according to their purpose. In this case, we have only one container, which is nginx. This container should be launched from the NGINX image (image: nginx). In general, the image name is specified in the format <repository/image>: <tag>, where the repository is the location from which Docker pulls the image, and the tag is essentially the version of the image.
If the repository and tag are omitted, the image will be taken from the latest version and downloaded from DockerHub, the most popular image registry. Let’s also mention another directive: ports. This allows us to access the container ports (which run in their own network) through ports on the local machine (localhost). On the left side is the port for the local machine, and on the right side is the container port. Thus, accessing localhost:8080 corresponds to the container process listening on port 80, the web server.
There can be many more directives in the file; you can find a complete list in the Compose file reference for Docker.
This file is all we need to run NGINX. Now we can open Docker Desktop, select Dev Environments, and create a new environment.
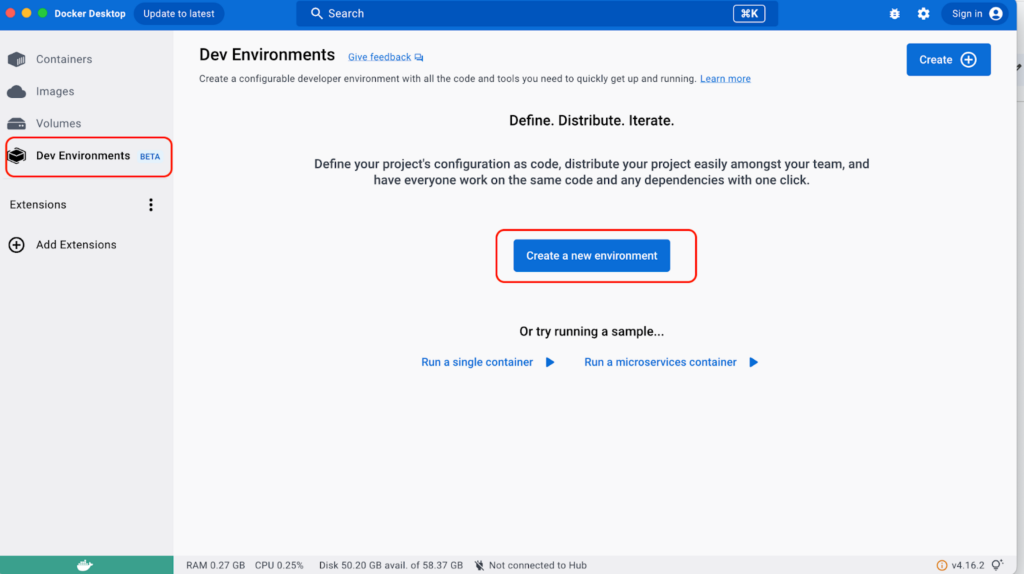
In “Choose source,” select “Local directory” and specify the directory where the compose-dev.yaml file is located.
Docker Desktop will download the latest NGINX image from DockerHub (or find the image on your computer if it was previously downloaded) and start a container based on it.
By clicking on the running container, we can see its logs. These are updated in real-time, so if we try, for example, to open a non-existent path (localhost:8080/nosuchpath), this fact will be immediately reflected in the nginx logs:
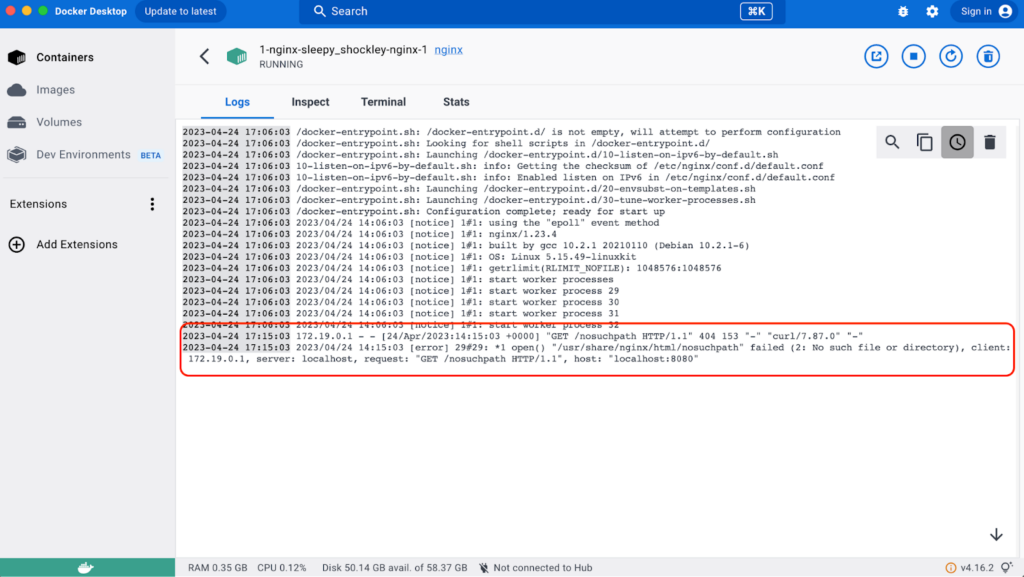
When containers run not on the developer’s machine but in a working environment such as a demo or production, their logs are usually collected by other containers and sent to specialized databases. This lets you view and search logs and get alerts based on specific log messages.
Now let’s try running a slightly more complex example. To simplify the current Dev Environment, we’ll delete it and create a new one based on a different file called compose-dev.yaml:
version: ‘3’
services:
wordpress:
image: wordpress
restart: always
depends_on:
– mysql
ports:
– 8080:80
environment:
WORDPRESS_DB_HOST: mysql
WORDPRESS_DB_USER: exampleuser
WORDPRESS_DB_PASSWORD: examplepass
WORDPRESS_DB_NAME: exampledb
volumes:
– wordpress:/var/www/html
mysql:
image: mysql
restart: always
environment:
MYSQL_DATABASE: exampledb
MYSQL_USER: exampleuser
MYSQL_PASSWORD: examplepass
MYSQL_ROOT_PASSWORD: ‘1’
volumes:
– db:/var/lib/mysql
volumes:
wordpress:
db:
This file is a slightly modified version of the file at DockerHub WordPress: ROOT_PASSWORD = 1, and the latest version of MySQL is used.
Storing logins and passwords in plain text is generally not recommended. They are typically stored in secure storage locations (such as GitLab CI/CD variables, Hashicorp Vault, etc.) and used during deployment. At the very least, secrets should be stored in a separate file, which we will show later, but for now, let’s leave things as they are.
Compared to the previous file, this is a bit more complex:
- It adds the depends_on directive to start WordPress after MySQL. Docker won’t wait for MySQL to start fully; it will just start one container and then the other.
- MySQL root credentials, another user, and the database are defined as environment variables. It is understood that the same databases, usernames, and passwords should be specified for both containers. Only the variable names differ. The variables used are described in DockerHub WordPress.
- Added volumes. This allows us to store files outside the container by mapping them. Without volumes, changes made inside the containers will be lost. That’s how containers work; changes inside them are not persistent. Here, we specify that changes made in the WordPress files and MySQL database will be preserved even after stopping or restarting.
An important note: the path to the MySQL host is specified using WORDPRESS_DB_HOST :mysql. Here, mysql is the service name for MySQL within the compose-dev.yaml file. If we named the service db, we would need to change both WORDPRESS_DB_HOST and depends_on to db.
Now let’s run the Dev Environment based on the updated file.
Open localhost:8080 in a browser and you’ll see the WordPress initialization window:
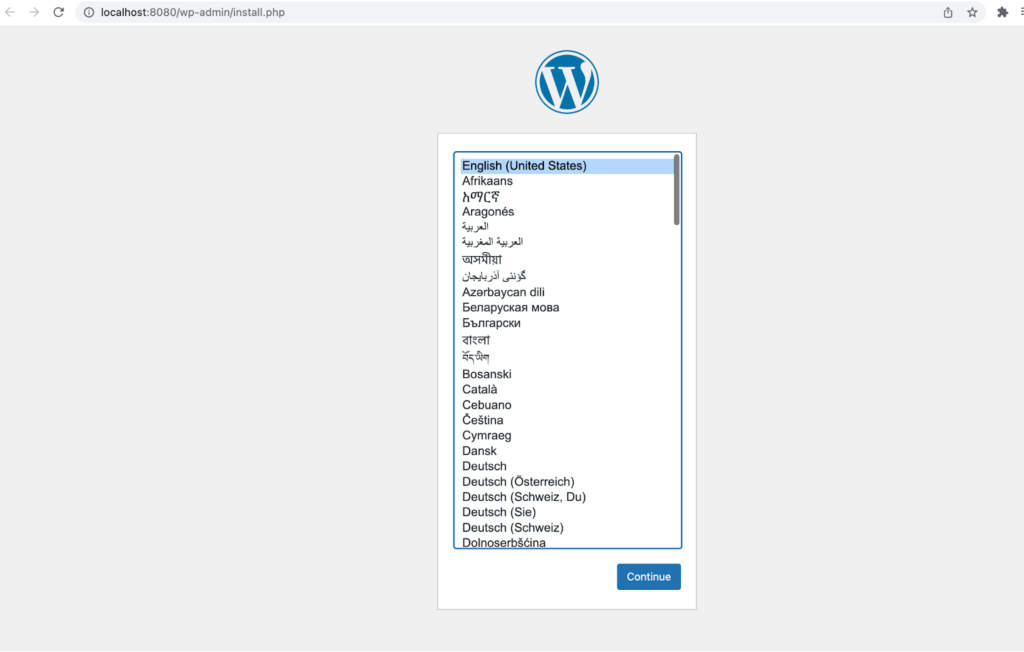
Initialize WordPress by entering the necessary information, including the login and password for the admin panel.
After making changes in the Pages section of WordPress and restarting the container in Dev Environments, we can see that the changes have been preserved.
Now let’s take our example further: we’ll separate all credentials into a separate file and add a phpMyAdmin container. Multiple dev environments can coexist, but port 8080 can only be used by one of them. For others, the localhost port needs to be changed.
For simplicity, let’s delete the current Dev Environment and create a new one using the following compose-dev.yaml configuration:
version: ‘3’
services:
wordpress:
image: wordpress
restart: always
depends_on:
– mysql
ports:
– 8080:80
env_file:
– local.env
volumes:
– wordpress:/var/www/html
mysql:
image: mysql
restart: always
env_file:
– local.env
volumes:
– db:/var/lib/mysql
phpmyadmin:
image: phpmyadmin
restart: always
depends_on:
– mysql
ports:
– 8081:80
env_file:
– local.env
volumes:
db:
Wordpress:
We can see that the phpMyAdmin container has been added, and the environment variables are read from the local.env file, which contains the following content:
WORDPRESS_DB_HOST=mysql
WORDPRESS_DB_USER=exampleuser
WORDPRESS_DB_PASSWORD=examplepass
WORDPRESS_DB_NAME=exampledb
MYSQL_DATABASE=exampledb
MYSQL_USER=exampleuser
MYSQL_PASSWORD=examplepass
MYSQL_ROOT_PASSWORD=’1′
PMA_HOST=mysql
PMA_USER=root
PMA_PASSWORD=’1′
Storing such a file in a repository is unnecessary, and it’s better to add it to the .gitignore file. This way, it will be read locally, and during deployment, for example, it can be automatically generated from GitLab secrets.
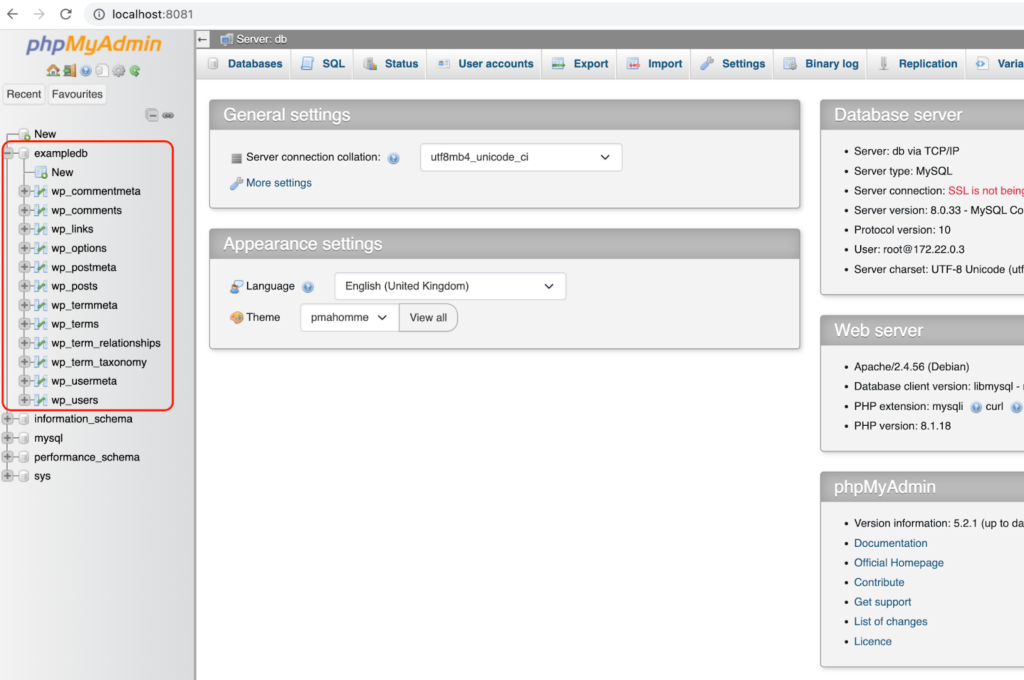
After launching Dev Environments and initializing WordPress at localhost:8080, we can see the WordPress database and tables in the phpMyAdmin console at localhost:8081:
In the examples above, we used the default WordPress setup (from the image). However, we would like to use our customized version and the ability to modify it.
Let’s download WordPress from the website. Create a separate folder — let’s call it demo-wordpress. Extract the archive of WordPress into this folder. Make changes inside the wordpress/ folder, removing the default plugins from wordpress/wp-content/plugins and adding the classic-editor plugin.
We will continue to use the same compose-dev.yaml file, but with two small changes:
- We’ll remove the use of volumes in the wordpress container by deleting the volumes section.
- We’ll specify our custom image, mywordpress:v1, as the image for WordPress.
version: ‘3’
services:
wordpress:
image: mywordpress:v1
restart: always
depends_on:
– mysql
ports:
– 8080:80
env_file:
– local.env
mysql:
image: mysql
…
Why mywordpress:v1 specifically, and how does it differ from the regular WordPress image? The name is arbitrary, including the version. It’s best, however, if the image name refers to the application within it. The difference from the standard image is that the web directory /var/www/html is replaced with our customized plugin.
How can we obtain such an image? It’s simple. We create a file named Dockerfile with the following content:
FROM wordpress
COPY ./wordpress /var/www/html
The words FROM and COPY are self-explanatory — we obtain our image from the WordPress image by copying our local wordpress/ folder into the image’s /var/www/html directory.
Make sure that the contents of the demo-wordpress folder look like this:
wordpress/
compose-dev.yaml
Dockerfile
local.env
Having described what needs to be done, let’s do it (note the period at the end — this is important).
$ docker build -t mywordpress:v1 .
Now, if we create a new Dev Environment, it will use the WordPress image we created.
Great! We’ve learned how to create our own images locally. However, it would be nice if this image were also available in the demo, staging, and production environments. In other words, we need to ensure that when we push changes to the repository, the image we built locally with the docker build command is also built remotely during the build and deployment process on the server.
Let’s assume our repository is stored on GitLab. To tell GitLab what to do after a push to the repository, we need to create a YAML file named .gitlab-ci.yaml with the following structure:
stages:
– stage 1
– stage 2
Job 1:
stage: stage 1
script:
– bash command
– …
Job 2:
stage: stage 2
script:
– bash command
– …
In summary, we declare the build stages in the stages section and assign tasks (jobs) to each stage. The scripts sections describe each task’s specific steps.
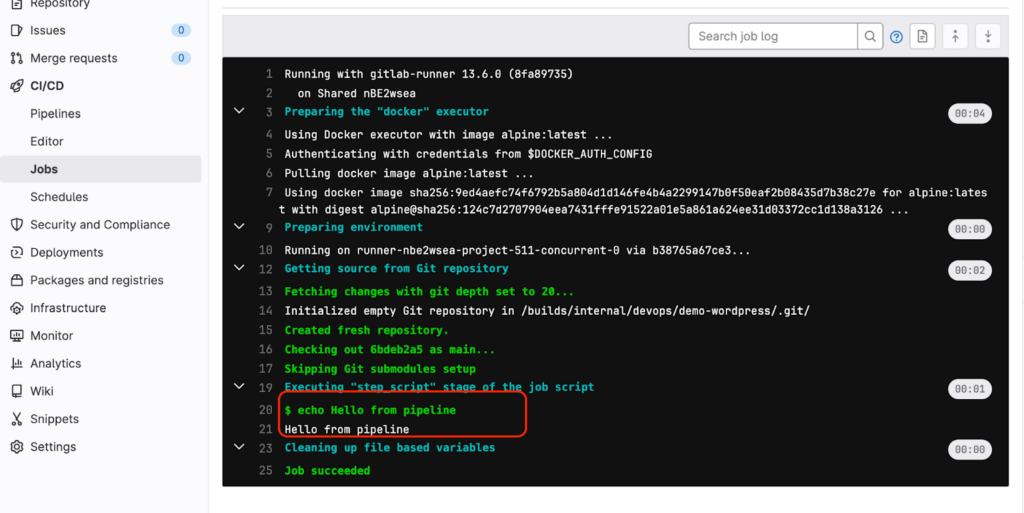
Here’s a simple example of .gitlab-ci.yaml:
stages:
– hello
Say hello:
stage: hello
script:
– echo Hello from pipeline
After pushing changes to the repository, the pipeline will say hello to us :).
In this article, I won’t cover the CI/CD device, runners, etc., but I’ll demonstrate the image build process discussed above.
The working file .gitlab-ci.yaml ready for compilation looks like this:
image: docker
services:
– docker:dind
variables:
IMAGE: $CI_REGISTRY_IMAGE:$CI_COMMIT_SHORT_SHA
stages:
– build
Build Docker image:
stage: build
script:
– docker build -t $IMAGE .
– echo $CI_REGISTRY_PASSWORD | docker login -u $CI_REGISTRY_USER $CI_REGISTRY –password-stdin
– docker push $IMAGE
Without going into details, the docker build command is executed here (below), which builds the image and then pushes it to the Gitlab repository, from where it can be retrieved for further deployment.
Unfortunately, deployment is beyond the scope of this introduction to DevOps with Docker. Other new elements (image, services, variables) are required to be able to build the image.
And we’re done! I hope this guide has been helpful to you and that you now understand what DevOps is and why it’s important. I hope you can also see how Docker and containers can help you create a unified environment and improve the quality of communication between developers, QA, and administrators.